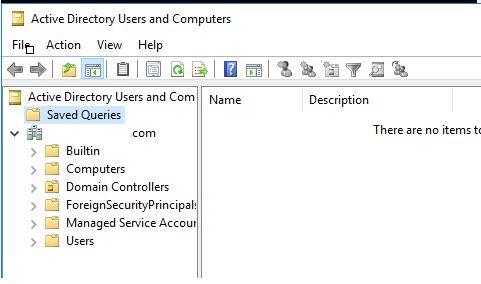
Active Directory Users and Computers (ADUC)
IT administrators have been working with Active Directory since the introduction of the technology in Windows 2000 Server. Windows 2000 Server was released on February 17, 2000, but many administrators began working with Active Directory earlier, when it was released to manufacturing (RTM) on December 15, 1999.
There are number of tools for Active Directory. The tool that we will cover today is Active Directory Users and Computers (ADUC), which was released with Windows 2000 Server.
Active Directory Users and Computers (ADUC) is a Microsoft Management Console snap-in that you use to administer Active Directory (AD). You can manage objects (users, computers), Organizational Units (OU), and attributes of each.

In addition to managing objects, ADUC can also manage domain operations. For example, you can use ADUC to raise the domain functional level or to transfer the RID, PDC Emulator, and Infrastructure FSMO roles to a different domain controller.
Active Directory Users and Computers (ADUC) is a common tool used by administrators in Active Directory AD to carry out everyday activities and much more. The following are some of the activities that an administrator may complete with the use of this MMC snap-in:
- Create and manage Active Directory objects and their attributes, such as users, computers, groups, and contacts.
- Create Organizational Units (OU), and move users and machines into and around them.
- Delegate Group Policy management permissions to users.
- In AD, define advanced security and auditing.
- Manage FSMO roles like RID master, PDC Emulator, and Infrastructure master.
- Raise the functional level of the domain.
- Advanced feature settings that help with the management of the LostAndFound container, NTDS Quotas, Program Data, and System data.
- Change passwords
- Reset user accounts
- Add users to security groups
How to Install Active Directory Users and Computers
The installation method for ADUC for Windows 10 1809 and later changes from the one for Windows 10 1803 and before. The following are the two methods for installing ADUC:
Installing Active Directory Users and Computers for Windows 1809 and higher
The deployment technique for ADUC for Windows 10 1809 and later changes from the one for Windows 10 1803 and before. The following are the two methods for installing ADUC:
Installing Active Directory Users and Computers for Windows 1803 and lower, and Windows 8
- Go to Start, select Settings, and then Apps.
- Click on Manage Optional Features.
- In the new window, click on Add feature.
- Select RSAT: Active Directory Domain Services and Lightweight Directory Tools, and then click Install.
The ADUC console will be included in the installation of Active Directory Domain Services and Lightweight Directory Tools. Go to Start to confirm. Windows Administrative Tools will now be on the list.
Installing ADUC using the command line
If you have Windows 10 version 1809 or later, you may also install ADUC through the command line as follows:
- Click Start (or press Win+R). Type “cmd” and click Enter.
- Run following commands:
dism /online /enable-feature /featurename:RSATClient-Roles-AD
dism /online /enable-feature /featurename:RSATClient-Roles-AD-DS
dism /online /enable-feature /featurename:RSATClient-Roles-AD-DS-SnapIns
How to open Active Directory Users and Computers
Several methods for opening Active Directory Users and Computers on a DC are as follows:
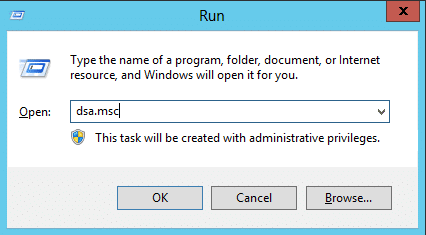
Using the RUN command
- Go to Start, and click Run.
- Type dsa.msc, and hit Enter.

Using the Start button
- Go to Start → Administrative Tools → Active Directory Users and Computers.
ADUC Use
To open the ADUC console, choose Start, then Administrative Tools, and then Active Directory Users and Computers.
- Choose the domain to which you wish to add the user, then expand its contents.
- Right-click the container to which you wish to add a user (often Users), choose New, and then User.
- Type the new user’s first name, last name and logon name. Then click Next.
- Type and confirm a new password for the user. Make sure you enable one of the following options to control how the user must manage their password:
- User must change password at next logon
- User cannot change password
- Password never expires
- Account is disabled
- Click Next.
- Make sure everything you entered is correct and then click Finish.
Add a user to a group
- Right-click the domain in which you want to add a user to the group and then select Find.
- Select Users, Contacts, and Groups in the Find dropdown list.
- Enter the name of the group you want to add the user to, click Find Now, select proper group in search results and click OK.
- 4. Go to Action > Properties and select the Members
- Click Add.
- Enter the name of the user to add to the group (if you specify multiple users, separate the names using semicolons), and then click Check Names. Alternatively, you can use Advanced button to search for the users one by one.
- Select each of the users you want to add to the group, and then click OK.
Remove a user from a group
- Right-click the domain from which you want to remove the user and then select
- Select Users, Contacts, and Groups in the Find dropdown list.
- Enter the name of the group you want to remove the user from and click Find Now.
- Right-click the group and select Properties.
- Go to the Members tab, highlight the user and click Remove.
Disable a user account
- Select the user’s domain and expand its contents.
- Right-click the user’s account. (To select multiple users, hold down the CTRL). Then click Disable Account.
Reset a user’s password
- Navigate to the Users folder of the user’s domain.
- Right-click the user’s name, choose All Tasks and select Reset Password.
- Type a new password, type it again in the Confirm password box, and then click OK.
Move a user to another OU
- Right-click Active Directory Users and Computers and select Connect to Domain.
- Enter the name of the user’s domain and click OK.
- Right-click the user and select Move.
- Choose the container you want to move the user to and then click OK.
Change a user’s data
- Right-click Active Directory Users and Computers and select Connect to Domain.
- Enter the name of the user’s domain and click OK.
- Right-click the user and select Properties.
- Navigate to the tab containing the data you want to change, make your edits, and click
Other Tools in RSAT for Managing Active Directory
RSAT also comes with the following tools:
Active Directory Administration Center – Here is where you can control the AD trash can and password rules, as well as view your PowerShell history.
Install the Active Directory Module for Windows PowerShell to enable PowerShell cmdlets for AD administration.
Domains and Trusts in Active Directory — Manages functional level, forest functional level, user principal names (UPNs), and trust between forests and domains.
Sites and Services in Active Directory – Allows you to access and administer your sites and services.
ADSI Edit — Has some capabilities for managing AD objects, however most experts prefer that you use ADUC instead.
Frequently Asked Questions
- What ADUC is used for?
ADUC is a Microsoft Management Console (MMC) snap-in that enables administrators to manage Active Directory objects and their attributes. For example, they can:
- Change passwords
- Reset user accounts
- Add users to security groups
- Create and delete organizational units (OUs)
- Handle FSMO roles like RID master, PDC Emulator and infrastructure master
- Create and manage computers, groups and users and their attributes
- Delegate control of objects
- Define advanced security and auditing in AD
- How do I get Active Directory Users and Computers on Windows 10?
In Windows 10 version 1809 or higher, you can enable ADUC by going to Settings > Apps and Features > Optional features > Add a feature. In older versions of Windows, to get ADUC, you need to download and install the RSAT package manually.
- How do I install RSAT on Windows 10?
Starting with the October 2018 update to Windows 10, RSAT is included as a set of “Features on Demand,” so you don’t need to install it. You simply need to enable the specific RSAT tools you require by going to Settings > Apps and Features > Optional features > Add a feature.
If you’re using an earlier version of Windows, you need to manually download and install RSAT.
- What is RSAT tool?
The Remote Server Administration Tool enables you to remotely manage Windows Server services and features from a Windows computer.
- What is included in Remote Server Administration Tools?
RSAT has a busload of tools, including ADUC, Active Directory Module for Windows PowerShell and Active Directory Administrative Center (ADAC).
So, that’s all in this blog. I will meet you soon with next stuff. Have a nice day!!!
Recommended content
RODC Installation Guide- Step by step guide to install read only domain controller
RODC Filtered Attribute Set
Installing and configuring a RODC in Windows Server-2012
How to find the GUID of Domain Controller
Understanding Group Policy Preferences
Group Policy Verification Tool GPOTool Exe
Group Policy Health Check on Specific Domain Controller
Netlogon Folder in Active Directory
Custom Attributes in Active Directory
Tombstone Lifetime of My Active Directory Forest
Computers AD Site From the Command Line
Active Directory Database Integrity
Disabling and Enabling the Outbound Replication
DFS Replication Service Stopped Replication
Strict Replication Consistency
The replication operation failed because of a schema mismatch between the servers involved
Troubleshooting ad replication error 8418 the replication operation failed because of a schema mismatch between the servers
Replication information in txt file
Repadmin Replsummary
Enabling the outbound replication
Guys please don’t forget to like and share the post. Also join our WindowsTechno Community and where you can post your queries/doubts and our experts will address them.
You can also share the feedback on below windows techno email id.
If you have any questions feel free to contact us on admin@windowstechno.com also follow us on facebook@windowstechno to get updates about new blog posts.

